Autodesk University
AU2014 Summary
December 2-4
Mandalay Bay, Las Vegas
Fusion 360 Digital Fabrication Workflows:
This course highlighted several features of Autodesk Fusion 360, a program that facilitates easy manipulation of 3D geometry otherwise difficult to achieve in Revit. After exporting a conceptual mass family from Revit to Fusion 360, an undulating wall form was created that could then be imported back into Revit, populated with curtain wall using adaptive components and rendered in a perspective street view with Google Maps background. That same form was imported into a program called Meshmixer that provides advanced options for preparing an STL file for 3D printing and allows you to apply custom supports. Altogether, the integrated workflow across several software platforms was relatively seamless and the course exhibited proof that very complex and customized geometry to be created in Revit for any project type.
Building a Good Foundation with Revit Templates:
Members of the architecture, engineering, construction and manufacturing industries gathered for this round table discussion about best practices for starting a project in Revit. Two methods were compared, the use of a Template File and Default Project. At Shepley Bulfinch, we use a template file at the outset of every project that contains a minimum amount of views, families and general standards to provide a good starting point. A default project has the advantage of carrying much more initial information including pre-placed families and objects but requires a significant time investment to keep the content current. Overall, the common sentiment in the room was that template files are easiest to maintain and offer the most versatility for any project type. Additionally, it is preferable not to “front load” Revit models and start out with unnecessary file size when one of the biggest challenges among all projects is keeping the model as small and responsive as possible.
Energy Analysis for Revit:
Are you familiar with the native energy analysis tool in Revit (hint: it’s under the Analysis tab on the ribbon)? This tool has the potential to be very helpful for early feedback to help drive the design. The task can be farmed out to the cloud for faster processing and to post reports for multiple options. For more in-depth analysis, the Revit model can also be exported to GBSxml format and opened in Green Building Studio, a cloud-based energy simulation platform. Relatively specific configurations are required within a model for the analysis to run successfully and one of the predominant takeaways of the course was the emphasis on modeling with energy analysis outcome in mind from the start of the project.
Challenges of LEAN Design and Computational Analysis:
This very engaging roundtable discussion examined the emerging role of computational analysis and generative design to help make more efficient design decisions. The keynote address at the beginning of the conference featured the use of "machine learning algorithms" where information and constraints are entered into a computer and simulations are run to determine an optimal design outcome. To start this session, we identified wastes and ineffective behaviors within each profession and in the collaboration process between. After a predictable round of architect-bashing, the question was proposed: "Does computation and simulation allow us to come to confident solutions earlier in the design process and reduce waste?" If existing condition information, user requirements, code constraints and many of the other variables that influence the design process can be programmed to generate permutations, is this a promising direction for the future of the profession? The group came to the conclusion that computational analysis and simulation will never be reliable enough to deliver a comprehensive design solution but may be helpful in providing direction at challenging moments in the process.
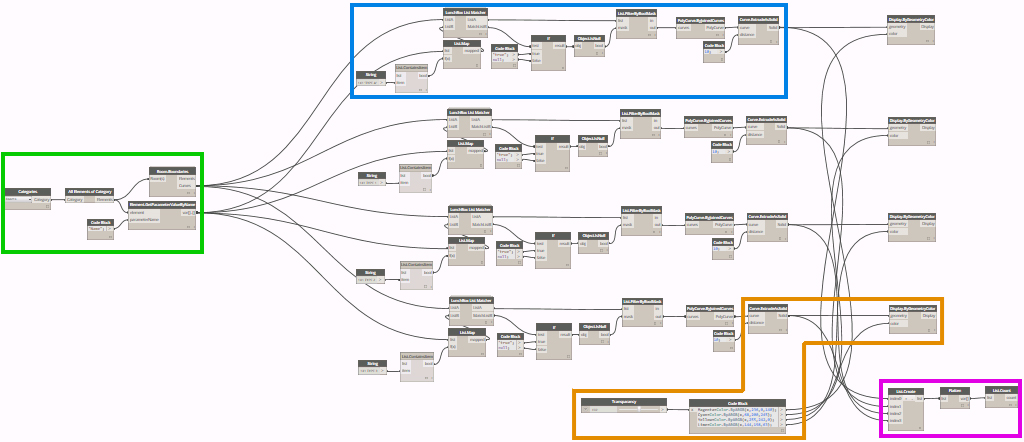
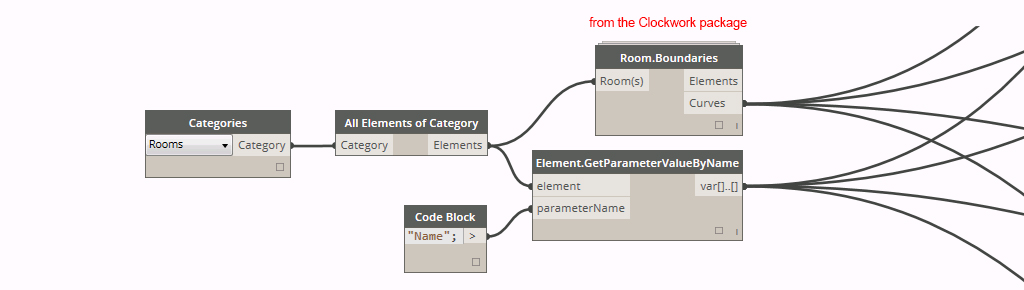
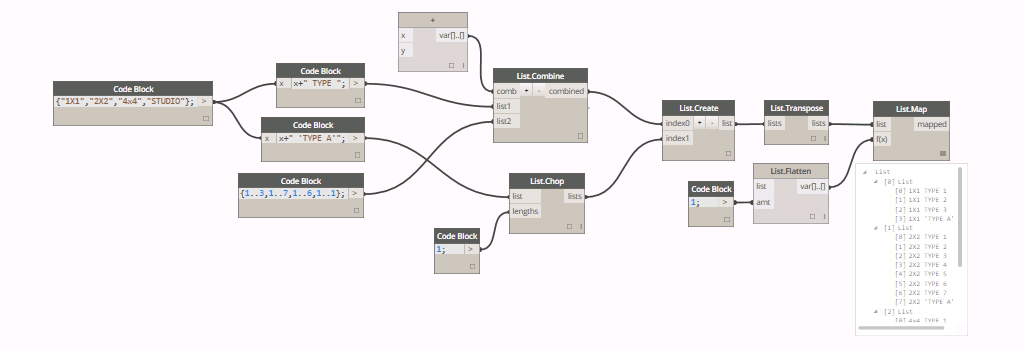
Practical Uses For Dynamo Within Revit:
Dynamo is a visual programming environment that allows you to make custom changes within Revit and extract information otherwise unattainable with the native program features. The program utilizes a user-friendly graphic interface to make adjustments within the Revit API (the "back end" which contains all the building blocks for how the program functions). This course demonstrated many entry-level uses for Dynamo including:
- quickly making changes to all instances of a family type in a model (example: adjusting the offset height of all columns at once)
- advanced family geometry (example: controlling profile order to create cantilevered and wrapped swept blends)
- wrapping structure along curved surfaces
- generating separate finish floor on top of slab automatically from room boundaries
Utilizing Revit Models for Architectural Visualization:
This course covered work flow and best practices for exporting a Revit model to the Unity 3D, a game engine that enables real-time visualization and walk-throughs. The first step is preparing the Revit model for export by cropping down only what you need with a section box and turning off unecessary categories in Visibility Graphics. Export the model to FBX and import it to 3DS Max where materials, cameras and lights are applied. Lastly the model is imported into Unity where perspectives, walk-throughs and animations can be utilized. In summary, Unity 3D provides a compelling presentation piece that may appeal to some clients but it is important to consider the time investment that goes into the preparation process.
Dynamic Energy Modeling:
An energy and environmental analysis consultant presented a multitude of methods for assessing daylighting, wind, weather, energy consumption and other performance characteristics of a design. Specific tools covered included eQUEST, Green Building Studio, Autodesk360 Lighting Analysis, raytracing and raycasting, Rushforth Tools Library, Autodesk Ecotect and more. Although these programs were generally too advanced for the level of in-house analysis we use at Shepley Bulfinch, I enjoyed learning about numerous ways information can be extracted from Revit and used to help inform the architectural design process.
Revit + Dynamo = The Building Calculator:
Beyond parametric modeling and making tweaks within Revit, Dynamo can be used to extract much of the information stored within a model. By using an "export to excel" function, areas, quantities, dimensions, room lists and so much more can be exported and analyzed with the powerful tools Excel has to offer. Schedules can be created, complex building calculations can be scripted and automatically updated upon every change within the model, or checks and balances for code and zoning can be integrated to produce reports. Items can then be adjusted, renamed or resized to push back into Revit from Excel and make direct changes to the model. Dynamo provides a giant step forward in the pursuit of harvesting the full potential of BIM.
The Great Dynamo Dig: Mine Your Revit Model:
With all this excitement surrounding Dynamo, did you know there is also a SQL export function? This allows for the creation of a much more comprehensive database that can be thoroughly organized using database management software and mined for analytics and appealing visual graphics in Tableau.